Jonas-Taha El Sesiy
Software Engineer

All views expressed are my own and not affiliated with current or former employers. Unless otherwise mentioned in the post, all projects are side projects which I work on on weekends and evenings.
Kubernetes: The client source IP preservation dilemma
A topic that’s been keeping me busy for a while now is how to ensure zero downtime when working in environments where the client source IP needs to be preserved. Let me elaborate on what the problem statement is exactly.
If you deploy an application on Kubernetes using a service type LoadBalancer, the cloud controller manager deploys a L4 load balancer in your respective cloud provider environment and usually allocates a public IP address for it. This allows users to effortlessly expose services to the public internet and common use cases include L7 load balancing solutions such as NGINX or Envoy. So far so good. Now if your application requires to know the real client IP this becomes a problem.
To understand the difficulty with this scenario, let’s have a look at how traffic routing works within Kubernetes. Each node runs kube-proxy which watches the API server for the addition or removal of service and endpoint objects. Without going into too much detail on user space, iptables and ipvs proxy modes, the basic idea is simple. When kube-proxy sees a new service, it will open up a new (random) port on each node for it. Now, when a client connects to the service IP, the proxy redirects traffic to its own port using some low-level routing logic, selects a backend and will proxy traffic from the client to it.
This works across nodes as the Kubernetes master assigns virutal IPs for services and kube-proxy keeps track of backends across nodes. For more info on this matter, I suggest taking a look at the outstanding official documentation here.
For the more visiual readers, here’s how this looks when using iptables proxy mode (most common).

Source: Kubernetes documentation
What you just read unfortunately doesn’t preserve the client source IP because kube-proxy replaces the source IP with a cluster internal IP due to the fact that the proxy randomly selects a backend to forward the traffic to. To prevent that, Kubernetes has a feature which explicitly tells kube-proxy to proxy requests only to local endpoints and not to other nodes. It’s as simple as setting the service.spec.externalTrafficPolicy to Local instead of the default Cluster. One thing to note here is that if there are no local endpoints, packets will be dropped. Again, more info on this can be found in the official docs.
Great, now our application is able to retrieve the actual client source IP instead of a cluster internal IP. This all sounds good until you have to think about upgrading your backend pods for the load balancer service, doing worker node ugprades or replacing entire nodepools.
Here’s why…
When a new service is added, the cloud provider’s load balancer backend pools is updated with the node IP and node port selected by kube-proxy. It then periodically checks whether the application is healthy using periodic probing. The healthchecks usually have to fail a certain retry count before the cloud provider decides to remove the ip from the load balancer pool. Now if kube-proxy doesn’t forward traffic to a different node and there’s a delay between the service endpoint removal and the cloud provider backend pool ip romal, we’re blackholing traffic.
Unlike adding a new service endpoint which automatically gets propagated to the cloud load balancer configuration, the removal of an endpoint does not. This could be seen as a design flaw of the cloud controller manager implementation but this is not a trivial problem to solve as the cloud provider has no way of knowing how downstream applications behave when connections are closed.
When presented with the aforementioned problem statement, solutions often propose adding the following two remediation items:
- Configure a
preStophook for the backend pods tosleepfor a certain period of time - Configure
terminationGracePeriodSecondsfor the pods to allow gracefully handle open connections before pod shutodwn
These are certainly important suggestions but only help in the case of a pod rolling update and only if either duration is at least as long as the cumulative time it takes for the health probes to fail and the backend pool to be updated. Since you might not have thought about this early on, you’re out of luck as changing it will trigger pod restarts.
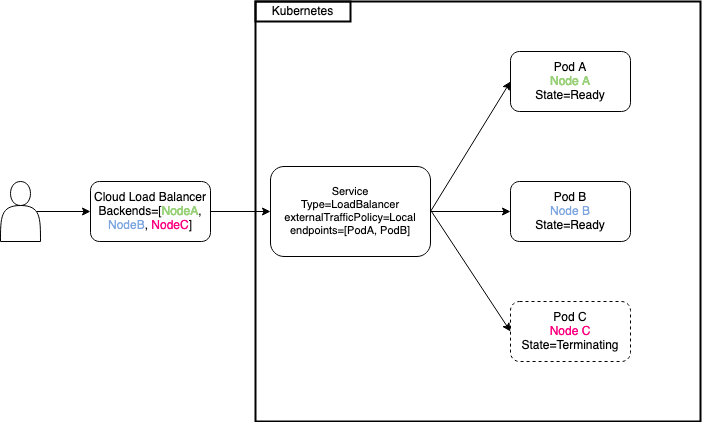
At the heart of the issue is the fact that the node is registered to the load balancer and not individual pods. What complicates matters is the fact, that the service endpoint is removed regardless of a preStop hook or the terminationGracePeriodSeconds, see this issue for more context. Due to these circumstances it’s almost inevitable to end in a situation where new connections go nowhere which will cause a service disruption for a few unlucky users of your service (the endpoint is removed from the service while the existing pod on a node gracefully terminates and there may not be a second pod on the same node to serve the request).
Here’s a small diagram depicting the unfortunate situation.
So what can you do you’re asking?
Well, until the the Kubernetes Enhancement Proposal (KEP-1669) is implemented which will dramatically improve the situation: not much. From what I know, you have to write some custom tooling to safely remove a node from your cloud provider load balancer outside of kubernetes since none of the existing primitives allow for zero downtime deployments.
Thanks for reading! It’s unfortunate that I can’t present you with a good solution but feel free to share your thoughts and reach out if you have any questions. Until next time ![]()
Tags: kubernetes, k8s, cncf, source ip, load balancer, kube-proxy, externalTrafficPolicy, graceful termination, zero downtime
Kubernetes: How to write a kubectl plugin
Hacktoberfest is almost over but since there’re plenty of opportunities to contribute, I decided to take over the task of re-writing a kubectl plugin called view-secret.
For those of you who are not familar with kubectl, it’s the CLI tool to work with Kubernetes.
In this post I’d like to shed some light on krew and what’s necessary to create your very own plugin. Okay, so what’s krew?
Krew is one of the many Kubernetes Special Interest Groups (SIG) and aims at solving the package management issue for kubectl. There’s a limited amount of core functionality that ships with kubectl so krew is all about allowing developers to create their own extensions and contribute them back to the community. All available plugins are stored in the krew-index, a central repo that plugin maintainers use to publish/update their plugins. If you haven’t used krew before, make sure to install it first.
Some early plugins have been written in Bash and the maintainer was asking the community to take over the re-write in Go/Python and ultimately the maintenance of the plugins.
Since my day job requires me to create & manage Kubernetes-based deployments, I find myself in need of decoding secrets all the time.
A secret - as the name may reveal already - is used to store secret information Base64 encoded. This resource type is often used to populate environment configuration for deployments, to store docker registry auth information or tls secrets.
The typical workflow to decode a secret without view-secret looks as follows:
kubectl get secret <secret> -o yaml- Copy base64 encoded secret
echo "b64string" | base64 -d
This gets quite cumbersome especially if you just want to check the entirety of a secret to see if everything looks ok.
There are solutions like kubedecode or the previous view-secret implementation that aim at solving this problem but lack either native kubectl integration, are outdated/not maintained anymore or require you to always provide e.g. the namespace as a parameter.
So I went ahead and created a new implementation for view-secret that is backward-compatible to the existing implementation but also adds a new capability, namely decoding all contents of a secret. My contribution has been accepted and the plugin is available now, so let me walk you through the process.
As it turns out, creating your own plugin is super simple and well documented here. All you have to do is create a binary with the prefix kubectl-, make it executable and place it somewhere in your $PATH. A sample plugin can be as easy as this:
# kubectl-hello plugin
cat <<EOF > kubectl-hello
#!/usr/bin/env bash
echo "hello from krew"
EOF

# Make executable
chmod +x kubectl-hello

# Copy into some $PATH location
cp kubectl-hello /usr/local/bin

# Run plugin
kubectl hello
## prints "hello from krew"
Since my language of choice for this project was Go, I created a new project and added integrations such as GoReleaser to simplify shipping the binary for mulitple platforms and Travis CI to automate running builds/creating releases. To simplify the build/test process I also added a Makefile.
At this point my project repo had the following layout:
cmd
  kubectl-view-secret.go
pkg
  cmd
    view-secret.go
    view-secret_test.go
go.mod
go.sum
.goreleaser.yml
.travis.yml
Makefile
The established workflow was pretty straight-forward:
- push changes to master –> triggers travis to run tests
- tag commit –> triggers travis to use goreleaser
I previously wrote about the usage of Makefiles in Go projects but for this project the targets are much simpler:
SOURCES := $(shell find . -name '*.go')
BINARY := kubectl-view-secret

build: kubectl-view-secret

test: $(SOURCES)
  go test -v -short -race -timeout 30s ./...

$(BINARY): $(SOURCES)
  CGO_ENABLED=0 go build -o $(BINARY) -ldflags="-s -w" ./cmd/$(BINARY).go
For the actual implementation I used spf13/cobra to parse flags and process user input. To get the secret contents I use exec.Command thus shelling out to the OS instead of using the kubernetes go client or cli runtime as they add a huge overhead for such a small functionality.
After I finished the implementation, all I had to do was update the plugins/view-secret.yaml spec in the krew index to use my new plugin. This meant changing the plugin description, the download links for the new binaries and the sha256 checksums. Once the Pull Request got merged, the local plugin index had to be updated via kubectl krew update and the plugin can be installed via kubectl krew install view-secret.
Now the workflow to decode secrets is as simple as this:
# print secret keys
kubectl view-secret <secret>

# decode specific entry
kubectl view-secret <secret> <key>

# decode all secret contents
kubectl view-secret <secret> -a/--all

# print keys for secret in different namespace
kubectl view-secret <secret> -n/--namespace foo

# suppress info output
kubectl view-secret <secret> -q/--quiet
This was my first CNCF contribution & I’m happy about the feedback I got from @ahmetb & @corneliusweig throughout the process.
The full plugin code is available on GitHub.
Thanks for reading! As always please reach out if you have any questions. ![]()
Tags: krew, kubectl, plugin, kubernetes, k8s, cncf, hacktoberfest
Kubernetes: oauth2_proxy with dynamic callback urls
We all love the simplicity of deploying applications on Kubernetes and while many tutorials out there help you get started quickly and provide a great resource for many, some of them spare important details. In this post, I try to help the community by providing a small guide on how to deploy oauth2_proxy with dynamic callback urls. But first, what is oauth2_proxy and which problem does it solve?
The README.md explains it as follows:
A reverse proxy and static file server that provides authentication using Providers (Google, GitHub, and others) to validate accounts by email, domain or group.
Okay great, so this tool comes in handy if you want to authenticate users for an application that doesn’t offer authentication by itself. Famous examples include the Kubernetes dashboard, Prometheus or Alertmanager.
There are multiple ways to solve the issue of serving apps that don’t offer authentication out-of-the-box:
- Don’t expose it at all and just browse it using
kubectl port-forward. This way, the application is never publicly exposed on the internet. - Expose it and handle authentication in a proxy sitting in front of the application using
oauth2_proxyvia existing providers (Microsoft, GitHub, etc.). - Establish your own (federated) idendity provider to handle user authentication using i.e. dex.
For the first option everyone who needs access to these tools need cluster access, so this is not a very flexible option. The second option is definitely more interesting because we can safely expose the applications on the public internet without much effort. The third option offer the most flexiblity but is a bit of an overkill for what I’m trying to achieve. Hence, I’ll be focusing on No. 2. But we might not want to have mulitple proxies in place which handle authentication independently for the respective app but rather a single instance that can be used by all apps. Let’s go through an example:
I want to expose Alertmananger and Prometheus to the same group of people and they should be able to seemlessly switch between the applications without the need to sign-in again.
First, I’ll be using helm to install the chart for oauth2_proxy and setting some custom properties which I need for the OAuth2 provider of my choice:
helm install stable/oauth2-proxy --name login-oauth2-proxy \
--namespace xyz \
--set config.clientID="${CLIENT_ID}" \
--set config.clientSecret="${CLIENT_SECRET}" \
--set config.cookieSecret="${COOKIE_SECRET}" \
--set extraArgs.provider="azure" \
--set extraArgs.azure-tenant="${AZURE_TENANT_ID}" \
--set extraArgs.whitelist-domain=".mydomain.com" \
--set extraArgs.cookie-domain=".mydomain.com" \
--tls
clientID, clientSecret and azure-tenant can be obtained upon registering the application for Azure Active Directory integration as described here. To restrict access to only a subset of users from the Active Directory make sure to follow these instructions after. It’s important to register the url of the ingress rule that will be used for authentication (see below), in my case https://login.mydomain.com/oauth2/callback.
The cookieSecret is just a random secret that can be generated with a simple python script.
docker run -ti --rm python:3-alpine python -c 'import secrets,base64; print(base64.b64encode(base64.b64encode(secrets.token_bytes(16))));'
Worth mentioning are the whilelist-domain and cookie-domain flags which should point to the parent domain of the applications to be protected, i.e.
You want to protect prom.mydomain.com and alerts.mydomain.com then this needs to be set to .mydomain.com.
Great, now we need an ingress route that handles authentication via the proxy we just deployed. This looks as simple as this:
apiVersion: extensions/v1beta1
kind: Ingress
metadata:
  name: login-ingress-oauth2
  namespace: xyz
  annotations:
    kubernetes.io/ingress.class: nginx
spec:
  rules:
  - host: login.mydomain.com
    http:
      paths:
      - backend:
          serviceName: login-oauth2-proxy
          servicePort: 80
        path: /oauth2
  tls:
  - hosts:
    - login.mydomain.com
Now all we have to do for the application that should be protected via our proxy is to use the auth-url and auth-signin annotations of nginx and have them reference this ingress route.
apiVersion: extensions/v1beta1
kind: Ingress
metadata:
  name: alertmanager-ingress
  namespace: tiller
  annotations:
    kubernetes.io/ingress.class: nginx
    nginx.ingress.kubernetes.io/auth-url: "https://login.mydomain.com/oauth2/auth"
    nginx.ingress.kubernetes.io/auth-signin: "https://login.mydomain.com/oauth2/start?rd=https://$host$request_uri"
spec:
  rules:
  - host: alerts.mydomain.com
    http:
      paths:
      - backend:
          serviceName: prom-prometheus-operator-alertmanager
          servicePort: 9093
        path: /
  tls:
  - hosts:
    - alerts.mydomain.com
Browsing alerts.mydomain.com will redirect to the microsoft login and after successful authentication back to the application. If you deploy multiple application using this method you won’t have to login again as the consent has been granted already and a valid cookie exists.
A few things to be mentioned:
- Depending on how many applications rely on the proxy, you might want to scale the oauth2_proxy deployment to ensure availability
- None of the explanations above indicate that you shouldn’t be taking care of proper RBAC rules in your cluster and restrict access to the applications according to the principle of least privilege.
That’s it for now, please reach out if you have further questions or remarks. Happy Sunday!
Tags: oauth2_proxy, nginx, sso, single sign-on, reverse proxy, nginx, kubernetes
Containerization of Golang applications
I’ve been a working a lot in Golang recently and even though it easily allows for single static binary compilation I find myself using Docker a lot. Why? Well, especially when it comes to container orchestration and scaling of workloads some sort of container technology is used as these build the foundation of a Pod in Kubernetes (our deployment infrastructure).
While coming up with an initial Dockerfile is easy, correctly compiling a Go application and adhere to all sorts of container best practices is still hard. Does the size of the binary matter? If so, you might want to provide some additional flags during compilation. Do you build the app outside of the container and just copy the final artifact into it or do you use multi-stage builds to have everything within an isolated environment? How do you deal with caching of layers? How do you make sure that the final container is secure and only contains whatever is needed to execute your application?
Furthermore, I saw a lot of different approaches in terms of runtime base image and how the build process takes place. Some are using for golang:alpine with manually installing ca-certs, tzinfo, etc. during the build stage whereas others use plain golang instead. For the final stage common choices are either scratch or alpine which still provide a larger attack surface than i.e. gcr.io/distroless/base. As with many things, there’s not a single correct approach because one might want to keep the ability to docker exec -it into a container around whereas others have better ways to debug their services.
While coming up with my current solution I had the following considerations to take into account. Local development should still be fast, the build process must be CI-friendly with clean & reproduceable builds and no additional tooling needed to secure the final image such as microscanner or clair. Hence, I created a Makefile that helps me take care of the heavy lifting and allows for fast local development where no Docker is used at all. A shortened & simplified version looks as follows:
OUT := binary-name
PKG := github.com/package
VERSION := $(shell git describe --always --dirty)
PKG_LIST := $(shell go list ${PKG}/...)
GO_FILES := $(shell find . -name '*.go')

build:
	go build -i -v -o ${OUT} -ldflags="-X main.version=${VERSION}" ${PKG}

test:
	@go test -short ${PKG_LIST}

vet:
	@go vet ${PKG_LIST}

errorcheck:
	@errcheck ${PKG_LIST}

lint:
	@for file in ${GO_FILES} ;  do \
		golint $$file ; \
	done

container:
	@docker build --build-arg VERSION=${VERSION} -t registry/image:${VERSION} .

container-push:
	@docker push registry/image:${VERSION}

run: build
	./${OUT}

clean:
	-@rm ${OUT} ${OUT}-*

.PHONY: run build vet lint errorcheck
I’ll talk about -ldflags in a bit, so don’t worry about it for now. Since the regular go build command doesn’t do static analysis on the project files, I created steps like vet (checks for correctness/suspicious constructs), lint (style mistakes) and errorcheck (missing error handling) I can run whenever I feel like it. This is not done implicitly through another step such as build because my CI system takes care of these things too. The rest of the file should be self-explanatory if you’re familiar with make.
Now, the following Dockerfile is only used in my CI system for which I don’t mind it to fetch the dependencies during each build.
# Build stage
FROM golang:1.11.4 AS build-env

LABEL maintainer="Jonas-Taha El Sesiy <[email protected]>"

WORKDIR /project
ARG VERSION
COPY main.go go.mod go.sum ./
RUN bash -c "go get -d &> /dev/null" && \
    CGO_ENABLED=0 GOOS=linux go build -ldflags "-X main.version=${VERSION} -s -w" -a -o app .

# Final stage
FROM gcr.io/distroless/base
COPY --from=build-env /project/app .
CMD ["./app"]
I’m using multi-stage builds with the latest Golang version as the base image. For the final stage, I opted for distroless even though the final image is bigger than the other choices. Note that I’m using go modules for dependency management introduced in Go 1.11 for which I copy the go.mod and go.sum files into the container.
As mentioned before, there are a couple of flags passed onto the go compiler via -ldflags. -X main.version=abc allows me to pass on the version information to the binary which is then used within the app in some fashion. -s -w disables the symbol table and the generation of debug data in form of DWARF in order to reduce the size of the binary which is useful for my production image.
This is just my take on this. If you have suggestions for improvements or any other remarks, please reach out. Thanks! ![]()
Tags: docker, container, golang, go